Using the Annotations Editor (2D images)
This page is a work in progress.
This capability allows data contributors to annotate 2D imaging data to draw borders around specific anatomical regions relating to ontological terms. These annotations then link out to the corresponding FaceBase anatomy page for that region, which displays more information on the region and lists any related data in the FaceBase repository.
Annotations can be used for:
- Teaching craniofacial anatomy
- Using the image in a manuscript/presentation
- Comparing the phenotype between a control and mutant
Features of annotated images in FaceBase include:
-
A scale displayed on the image that adjusts to the level you are zoomed in or out.
-
A Screenshot function to download a jpg file that includes the scale and uses the Record ID as the filename.
-
All data records in the FaceBase repository are citable. To share and cite an annotation, click the Share Annotation icon in the annotation row and choose one of the permanent identifier links. The Versioned Link refers to the current version of the annotation. The Live Link will take viewers to the current version.
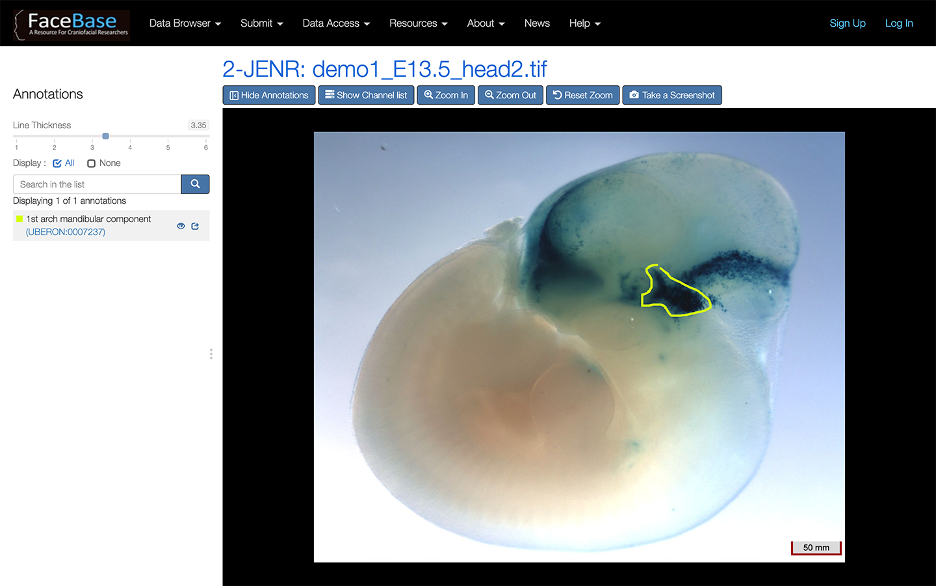 Example of an annotated image
We offer two paths for annotation: online from your web browser or offline via a third-party tool called QuPath.
Online annotation in the Data Browser
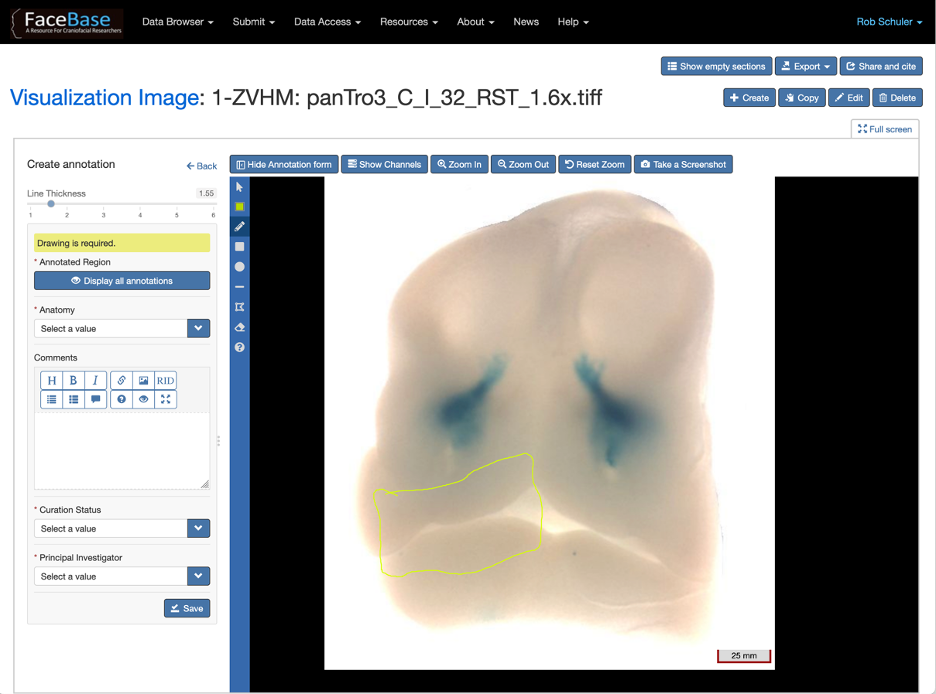 Example of the Annotations Editor
-
Log in to FaceBase. This capability requires membership to the “FaceBase Curators” Globus group. If you have been set up with and joined a FaceBase Project, you should already be in this group. To check if you are part of “FaceBase Curators”, log in to FaceBase, click your username in the top right corner and choose “My Profile”. You will see a list of all the Globus Groups you are subscribed to.
-
Navigate to the image of choice. From a Dataset page, you can scroll down to the Imaging Data section and click the View Details icon of the image you want to annotate.
-
Scroll down to the Visualization section. Depending on your display, you may want to click the Full Screen icon.
-
Click Show Annotations to open the Annotations interface.
-
Click New to start a new annotation.
-
Choose the anatomical region from the Anatomy field
-
Use the drawing tools in the blue bar to the left of the image and outline the region(s) of interest.
-
Use the Comments field to enter more information about your annotation, which you can also format for improved readability.
-
Click Save to save the annotation. It will now be listed when anyone navigates to the image and chooses “Show Annotations” in the record.
NOTE:
- If the anatomical region you want to annotate already exists, but there are additional annotations you want to make, make sure to edit the existing annotation (click the pencil/Edit icon) instead of starting a new one. This ensures annotations for a single anatomical region all use the same color (for identification purposes).
Offline annotation with QuPath
QuPath allows you to yadda yadda. Good for more complex annotations or if you just prefer to work offline. Now you can take your image (or download one from the GUDMAP/RBK repository), annotate it in QuPath (with x, y, z caveats) and then upload it back to the website where it will be available for viewing by the public along with the original file.
Markdown from viewer help on annotator:
How to Annotate an Image
Add a new Annotation
-
Make sure that you are logged in.
-
On the left hand side, beside the image you will see a
Newbutton. Click on it to open theCreate annotationpanel. -
Fill in the following fields:
-
Select the related anatomical term in the
Anatomyfield. (Required) -
Enter any useful description of your annotation in the
Commentsfield. You may format your text using the formatting icons above the field. (Optional) -
The
Curation Statusfield isIn Preparationby default, which means it is not viewable to the public. You may change this field toPI Reviewif your lab uses that status for internal review or toSubmittedto send it to the Hub for biocuration and subsequent release to the public. -
Select the relevant
Principal Investigator. (Required) -
Select the relevant
Consortium. (Required)
-
-
Select the desired annotation shape from the
Annotation Toolbar. You may choose from pencil icon (freehand drawing), rectangle or circle. -
Draw the shape in the desired location on the image. (You may use multiple and different shapes within the annotation). See Draw a shape for more details about the different drawing options.
-
You may de-select the current shape by click on the same shape from the
Annotation Toolbar. -
To save your annotation, click on the
Savebutton in theCreate annotationpanel.
Edit/Delete an existing Annotation
-
Make sure that you are logged in.
-
Click on the
Edit Annotationicon of the annotation that you want to edit. -
To change the color of the annotation, pick a different color from the color picker (red square). This will change the color of all the shapes of the annotation that share the original color.
-
To delete a shape from this annotation, select the
Erasetool from the annotation toolbar and click on the shape that you want to delete. -
To add a new shape, select the shape that you want from the annotation toolbar and start drawing it on the image.
-
After you are done making your changes, click on the
Savebutton in theEdit annotationpanel. -
To delete the entire annotation, click on the
Deletebutton in theEdit annotationpanel.
Draw a Shape
-
Select the tool from the annotations toolbar. You choices include: path (pencil icon, where you can use your mouse to draw the shape), rectangle, circle or polygon.
-
For most tools, you’ll press and hold the left mouse button where you want to start drawing the shape on the image. Then drag the mouse to draw the shape to your desired dimensions and let go of the button to stop drawing the shape. With the path (pencil) tool, you’ll press and hold the left mouse button at the starting point and keep dragging the mouse in the desired path until you come back to the original point and then let go of the button.
-
To add subsequent paths, repeat steps 2 & 3.
-
When you are finished with adding paths, click Save.